08 Dec 2014 Using Amazon RDS in Web Application Hosting
The common scenario for using Amazon RDS is to be connected to application servers. An example for this is a solution introduced by Amazon:
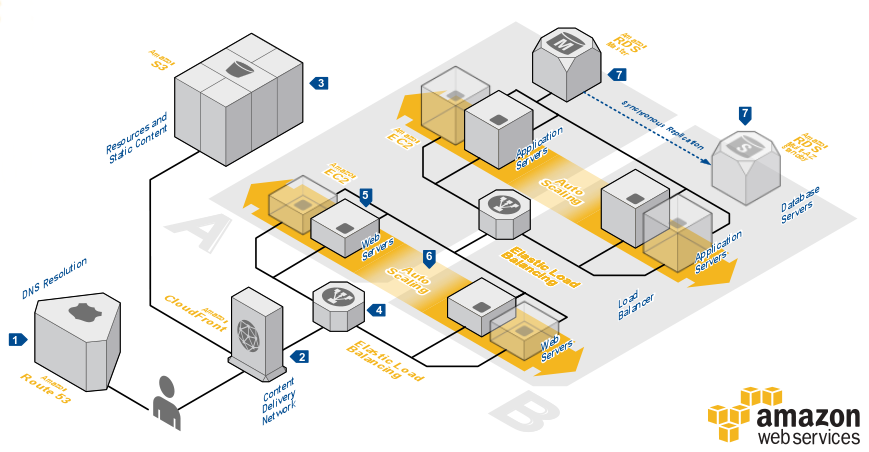
Web Application Hosting
According to this solution. the client requests will be received by the CloudFront, that will retrieve the static contect from the S3 storage (if not found in the CloudFront Cache). For the dynamic content, CloudFront can now handle it too (for more info, click here). If the content is not cached, CloudFront passes the request to ELB1 that distributes the requests on one of the web servers. The web server itself passes the request to ELB2, via FastCGI protocol, and consequently to one of the app servers. The php request is processed, and the result is returned way back to the CloudFront to present the dynamic content to the end users. The app servers are connected to RDS that can be replicated using Multi-AZ deployment. (for more info, click here)
In this post we will focus on using Amazon RDS in Web Application Hosting.
First: The Application Server/s
The application servers are deployed on EC2 instances, in front of an ELB (Elastic Load Balancer) distributing traffic among them automatically across different AZs to increase availability and durability.
For more information about how the ELB works, click here.
The application servers can be subjected to Amazon Auto-Scaling Service, degrading or upgrading the number of the instances on demand. Using this service increases efficiency; no wasted resources and no need for permanent updates for temporary work loads. But some reviews mentioned that it needs some warming up to work properly.
According to the solution, the app server connects to a database. To make this communications possible:
apt-get install php5-mysql
WordPress is installed on the app servers to present the dynamic content. After installation, some configurations are made:
cp /var/www/html/wordpress/wp-config-sample.php /var/www/html/wordpress/wp-config.php
then inside the wp-config.php file, the database information is specified:
// ** MySQL settings - You can get this info from your web host ** //
/** The name of the database for WordPress */
define( ‘DB_NAME’, ‘DB1′ );
/** MySQL database username */
define( ‘DB_USER’, ‘Spirula’ );
/** MySQL database password */
define( ‘DB_PASSWORD’, ‘password‘ );
/** MySQL hostname */
define( ‘DB_HOST’, ‘RDS_end_point‘ );
The DB_Host is the End point provided by Amazon for the DB instance to be created later.
chown -R www-data.www-data /var/www/html/*
The last command is essential, because if it was skipped Nginx will not be able to present the content.
As previously stated, PHP-FPM is needed to parse the PHP requests. So we have to install php5-fpm, and configure it properly.
To do so we have to edit the listen directive, add the app server IP and make it listen to FastCGI port (port number 9000)
vim /etc/php5/fpm/pool.d/www.conf
; The address on which to accept FastCGI requests.
; Valid syntaxes are:
; ‘ip.add.re.ss:port’ - to listen on a TCP socket to a specific address on
; a specific port;
; ‘port’ - to listen on a TCP socket to all addresses on a
; specific port;
; ‘/path/to/unix/socket’ - to listen on a unix socket.
listen= app-server_IP:9000
Second: Setting up RDS
Amazon presents many ways to set up RDS, one of which is through the management console, which will be used in this post.
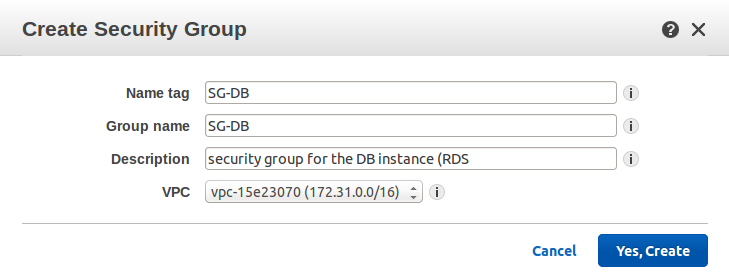
The first thing to be done before going through the steps of setting up RDS, is to create security group. From the RDS menu, “Security Groups” is selected. If the DB instance will be created in the Free Tier, the following message is displayed:
If this is the case, then “Security Group” is selected from the VPC menu.
After the security group is created, it’s edited to specify the security rule. The security group is set up to accept inbound traffic on port 3306 (MySQL port). The Source and destination can be left 0.0.0.0/0 to allow traffic from/to any IP. But this action is not recommended in production. The optimal case in this solution is to limit the traffic to the app servers.
When the security group is ready, it’s time to start setting up RDS.
Step 1:
This is the step of choosing the DB engine to be used for the creation of the DB instance.
Amazon RDS supports MYSQL, postgreSQL, Oracle Database and Windows SQL server. Several versions are available for each option.

Step 2:
This step is where you decide the purpose of the DB instance to be created.
One of the important options of RDS is Multi-AZ deployment that can provide high availability of 99.95%. This option is suitable and recommended for production. Yet, it’s not available for Free Tier.
For more information about the Multi-AZ Deployment, click here.
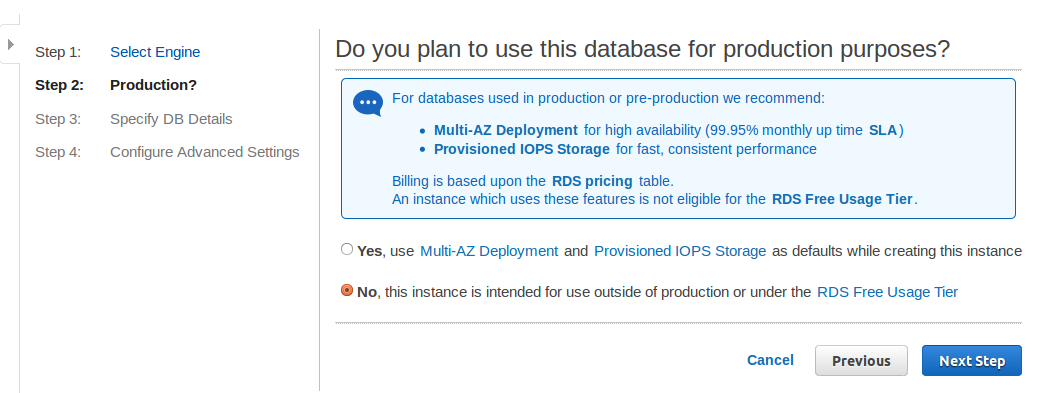
Selecting “Yes” for this option means creating new Multi-AZ deployment. However, if “No” was selected, Amazon gives the option of changing this later; converting an existing Single AZ DB instance into Multi-AZ one.
It’s important to note that in case of using Single AZ in production, there will be a single point of failure if the database became down for any reason. It takes too long to restote back the database, in addition to the loss of any updates being made during the restore process. That’s why RDS is recommended to be using with the Multi-AZ option in case of production, to make use of the enhanced availability and durability.
Step 3:
It’s time to specify the specs of the DB instance.
- License Model: License type associated with database engine.
For MySQL: it’s “general-public-license” - DB Engine Version: Select one of the versions (5..621 , 5.6.19a. 5.5.40a, 5.1.73a)
- DB Instance Class: Select one of the available instance types offered by amazon.
The unit for the instances CPU (number of virtual cores) is vCPU, a new unit introduced by Amazon earlier this
year, replacing the ECU, unit the has been used before.
Note that only the micro instance are allowed for the Free Tier. Every other instance has different pricing per hour.
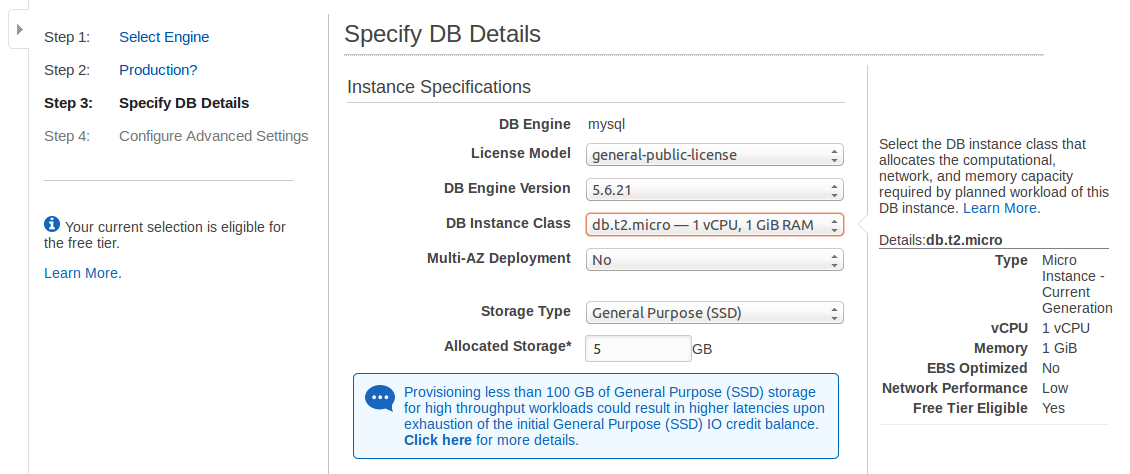
- Storage type: Select the instance’s storage type.
Amazon introduces three types of storage:1. General Purpose (SSD) storage: suitable for a broad range of database workloads. Provides baseline of 3 IOPS/GB
and ability to burst to 3,000 IOPS.2. Provisioned IOPS (SSD) storage: suitable for I/O-intensive database workloads. Provides flexibility to provision
I/O ranging from 1,000 to 30,000 IOPS. (But this type is not allowed for Free Tier)3. Magnetic storage: may be used for small database workloads where data is accessed less frequently. - Multi-AZ Deployment: Another promotion whether to use Multi-AZ or not.
- Allocated Storage: Select the storage size.
The storage size to be allocated depends on the storage type.
- For General Purpose storage, the allowed minimum size is 5 GB, while the maximum is 3072 GB.
- For Provisioned IOPS storage, the allowed minimum size is 100 GB, while the maximum is 3072.
It opens another option, “Provisioned IOPS”. RDS MySQL supports IOPS/GB ratios between 3 and 10. - Magnetic storage, like the first type, the allowed minimum size is 5 GB, while the maximum is 3072 GB.
And of-course, the bigger the allocated storage size, the better the IOPS performance.
Then comes the point to adjust the settings of the instance:
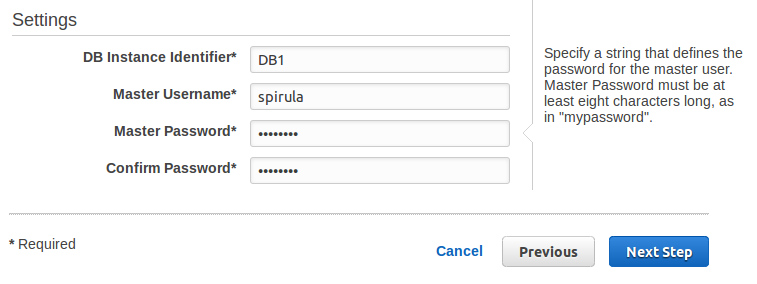
- DB Instance Identifier: Must be unique among all the DB instances created.
- Master Username: Must b a string starting with a letter. Used to login to the DB instance, adding users and changing permission in the databases.
- Master Password: Must be at least 8 characters long.
Step 4:
Finishing the configurations, comes the Network and Security adjustments, Database settings, Back up strategies, and Maintenance plans.
1st: Netwok and Security:
- VPC: Choose the VPC where the DB instance will be created.
The VPC defines the virtual networking environment for the DB instance - Subnet Group: Choose the subnet group to define the IP range from which the instance will be granted an IP address.
The subnet group is associated with the previously selected VPC.
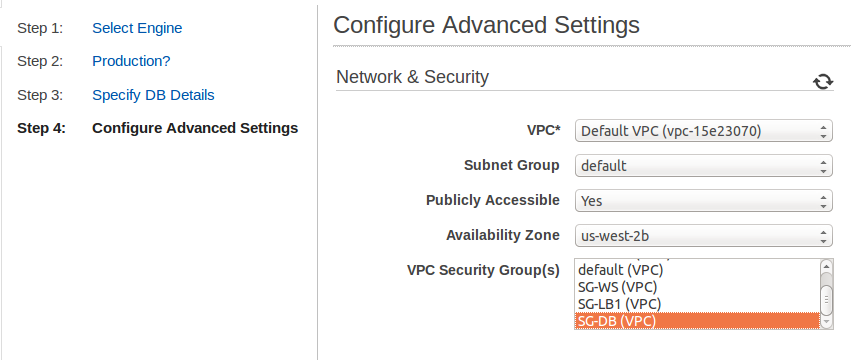
- Publicly Accessible: Choose whether to make the DB instance publicly accessible or not.
Note that going for the option of not making it publicly accessible means the instance will have an internal IP from the subnet of the AZ selected. Hence, it will be only accessible through the app server in the same AZ. But it will be a serious problem if this app server went down, or if there is a need to access the DB or send queries from another instance in another AZ.
The alternative is to choose it to be publicly accessible, and restrict the access by the pre-configured security group which - by the way - can be modified any time. - Availability Zone: Choose the AZ where the Db instance will be created.
- VPC Security Group: Choose the security group that defines the security rules to be applied to the DB instance.
The security group that was created before starting the RDS set up is used here.
2nd: Database Options:
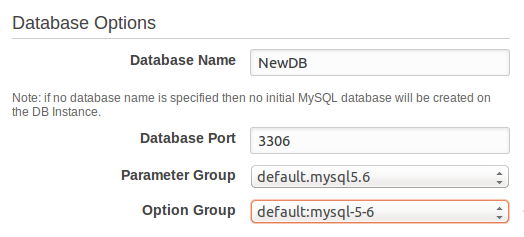
- Database Name: The name of the database to be created when Amazon RDS creates the DB instance.
- Database Port: The port to be used for connections with application servers.
Note that the security group and any other applied firewalls should allow traffic on this port. - Parameter Group and Option Group: Both depends on the selected version of the DB engine.
3rd: Backup :
Amazon RDS presents different strategies for InnoDB and MyISAM. For InnoDB, automatic backup is supported.
- Backup Retention Period: Decide the number of days Amazon will hold the backup to be retained.
The retention period can be up to 35 days.
To disable backups, “0” is selected.
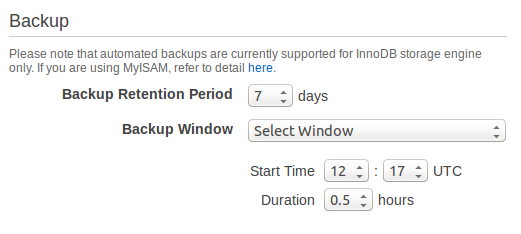
- Backup Window: If automatic backups are enabled, Amazon RDS asks for a time window (in UTC) when to create those backups.
That was the case for InnoDB, but it’s different for MyISAM. Amazon RDS’s restore strategy requires a crash-recoverable storage engine. Unfortunately, MyISAM doesn’t support crash recovery and data may get lost. However, MyISAM tables can be converted into InnoDB to avoid this problem. Else Amazon recommends some steps to follow in order to take snapshot for MyISAM tables, which are (as mentioned in the documentation):
- Stop all activity to all tables.
- Lock and flush all tables.
- Issue “CreateDBSnapshot” API call, or use the Amazon RDS CLI command “rds-create-db-snapshot”.
(Yes, Amazon RDS has command line tools, that cam be used for the whole has RDS creation process.)When the snapshot is completed, locks can be relesed and activity on the MyISAM tables can be resumed.
It’s worth noting that Backups won’t cost extra money if the backup size doesn’t exceed the allocated storage. in case it’s bigger than that, there is no need to worry, as the price for 1 GB/month is relatively low. But the prices differs according to the storage type and the deployment type.
One more thing to mention about backups. They are not restricted to the automatic backups. Snapshots can be taken anytime, and restored later whenever needed. But for sure it’s not for free.
4th: Maintenance:
- Auto Minor Version Upgrade: Choose whether to allow Amazon RDS to perform automatic version upgardes.
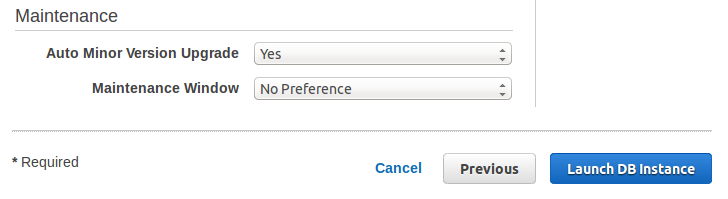
- Maintenance Window: If automatic upgrades are enabled, Amazon RDS asks for a time window (in UTC) when to perform the upgrades. It’s also when any pending modifications to the database take place. However, if no time window was selected, Amazon RDS will assign it randomly.
Now, the DB instance is ready to be launched. After launching the instance, all the instance details can viewed by choosing this instance from the DB instance list. The most important thing is the endpoint assigned to it. This endpoint, or so called DNS name is used to communicate with the DB instance. No IP address will be granted to this Instance, means it can’t be directly accessed using SSH command.
So now, how to use the DB instance and what to do with the DNS name?
The DB instance needs a MySQL-compatible client application. So MySQL client can be installed to the app server or any instance that was granted access to the DB instance through the DB security group. Also the DNS name must be provided for the DB_Host value as mentioned earlier for the connection to be established.
Standard SQL commands can be issued to create users and tables. But there are some restrictions by RDS on MYSQL, the most important of which is that RDS disallows SUPER privileges. But RDS makes up for this by providing a specialized form of the MySQL “kill” command.